There are many articles about Audi on CES, I think this is one of the best:
http://www.golem.de/1101/80597.html (german)
By the way: e.solutions is Audi’s joint venture to develop the new MMI infotainment system for the next A3 in 2012.
There are many articles about Audi on CES, I think this is one of the best:
http://www.golem.de/1101/80597.html (german)
By the way: e.solutions is Audi’s joint venture to develop the new MMI infotainment system for the next A3 in 2012.
I’ve wanted to implement a fully integrated Java based OSX tool for a while, during Xmas holidays I finally got to it: PowerNap.
PowerNap puts your computer to sleep after a given amount of time. Available for OSX and Windows.
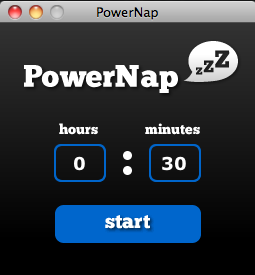
featuring a design from my favourite web specialist :*
Sourcecode also available via GoogleCode.
If you miss the Win7 way of aligning windows by pushing WinKey + ArrowKey on OSX, there’s help: https://github.com/fikovnik/ShiftIt
Just press ctrl+alt+cmd and a Arrow key and your windows will be arranged as you are used to.
Best of all: It’s free.
function isAdult($birthyear, $birthmonth, $birthday)

{

	$birthdayTime = mktime(0, 0, 0, $birthmonth, $birthday, $birthyear);

	$now = time();
$ageSeconds = $now - $birthdayTime;
$years = $ageSeconds / 3600 / 24 / 365.25;
return $years >=18;
}
if(isAdult($year, $month, $day))
{
echo "your adult! feel free to buy guns.";
}
else
{
echo "goto kindergarden!";
}
create the new file with your desired size (usually swap file is as big as RAM)
Attention: dd count parameter means number of blocks (thus 4GB = 4 million blocks with blocksize 1K)
SWAPFILE=/home/swap.file

SWAPMEGABYTES=4096
#create the new file
BLOCKCOUNT=$(($SWAPMEGABYTES * 1024))
dd if=/dev/zero of=${SWAPFILE} bs=1024 count=${BLOCKCOUNT}
#format the file with swap file system:
mkswap ${SWAPFILE}
add the new file with type swap to fstab:
vi /etc/fstab
add new entry for swap file:
/path/to/swap.file none swap sw 0 0
remount fstab:
mount -a
activate swap for all entries in fstab:
swapon -a
show if everything worked well and swap space has changed:
free
client —–> server
create the client’s ssh key (if not existing already)
ssh-keygen -t rsa
if you’re adding the first key, just copy the public key ~/.ssh/id.rsa_pub to the server
scp ~/.ssh/id_rsa.pub user@server:.ssh/authorized_keys2
to append another key, use:
cat ~/.ssh/id_rsa.pub | ssh user@server 'sh -c "cat - >>~/.ssh/authorized_keys2"'
sudo mkdir /media/ramdisk
sudo mount -t ramfs ramfs /media/ramdisk
http://www.bittbox.com/category/freebies/
in order to start remote debugging your php scripts right from your development server, you’ll need the Zend debugger for your server’s platform from here:
http://www.zend.com/en/products/studio/downloads
Chose the right ZendDebugger shared library for your PHP version (e.g. 5_2_x_comp/ZendDebugger.so) and copy it to your server – most likely where your other PHP extensions reside (in my case a turnkey LAMP stack —> directory /usr/lib/php5/20060613+lfs)
Now add a little information to the end of your php.ini. Make sure, you use the right php.ini file (if you’re unsure: consult phpinfo() under the key “Loaded Configuration File”)
zend_extension = "/usr/lib/php5/20060613+lfs/ZendDebugger.so"
zend_debugger.allow_hosts = 192.168.43.1
zend_debugger.expose_remotely=always
zend_debugger.passive_mode_timeout=600
Of course adjust the first to lines accordingly. Allowed host is the IP address of the PC that’s running your Eclipse IDE. For more information on these directives, consult TFM 😉
Just a small notice on ‘allowed_hosts’: You can define full netmasks here, such as 192.168.0.0/16 – that means every IP in 192.168.*.* – perfect for home DHCP or teamwork.
If your installation work was succesful, you’ll see a new paragraph in phpinfo() output that refers to as “Zend Debugger”
simply delete the cached data stored in a folder like:
C:\Users\YOUR_USERNAME\AppData\Roaming\Nokia\PCSync\SynchData\